Chris Appleton’s fountain pony tutorials and Coachella’s spiky-bun moment proved the summer palm tree ponytail 2026 isn’t going anywhere. Below: five versions, from the Buttercream Cascade to the Spiky Statement, ranging from “I did this half-asleep” to “people will ask who styled you.”
Soft Wave High Ponytail

This is the one you can do on a Tuesday morning and still wear to the beach. A beach wave ponytail tutorial works best on second or third-day hair with some natural texture already there—if your hair is freshly washed, apply a lightweight texturizing spray to damp roots and let it dry. Gather your hair into a high ponytail at the crown, but don’t pull it tight. Wrap a thin elastic around the base, then gently loosen the ponytail by tugging outward on small sections all the way around the crown—this creates volume without frizz. Take a 1.5-inch curling iron and loosely wrap two-inch sections of the ponytail tail around the barrel, holding for three seconds and releasing without fully straightening them out. The waves should look half-formed, almost accidental. You’re done when it looks like wind did the work.
Scarf-Wrapped Sleek Ponytail

A geometric silk scarf transforms a basic high ponytail into something that reads like you planned it. Brush your hair back into a tight ponytail at the crown, smooth any flyaways with a fine-mist hairspray, and secure with a clear elastic. This is where the silk scarf ponytail tutorial gets intentional: take a vintage-print or solid silk scarf (about 30 inches long), fold it into a thin band, and wrap it around the elastic base twice, tucking the ends under themselves. The scarf shouldn’t slip, but if it does, a small bobby pin hidden underneath fixes that in seconds. The contrast between the sleek ponytail and the patterned scarf is doing the visual work here, so keep the ponytail part minimal and let the scarf be the detail.
Glass-Slick High Ponytail

Tension at the scalp is everything. Comb your hair straight back from your forehead, pulling hard enough that your hairline feels slightly taut—this is the opposite of gentle. Gather at the crown and use a small clear elastic first, then wrap a second elastic one inch above it, which creates what stylists call the fountain lift, and this is what prevents the whole thing from looking flat. Smooth every single strand with a lightweight smoothing serum (applied to your palms, then pressed down) and finish with a light hairspray. The sleek high ponytail tutorial only works if the hair looks wet or glass-like, so don’t use too much product—you’re aiming for shine, not crunch. You’ll need to redo the front two pieces after lunch or a workout, but that’s a 90-second fix with a fine-tooth comb and serum.
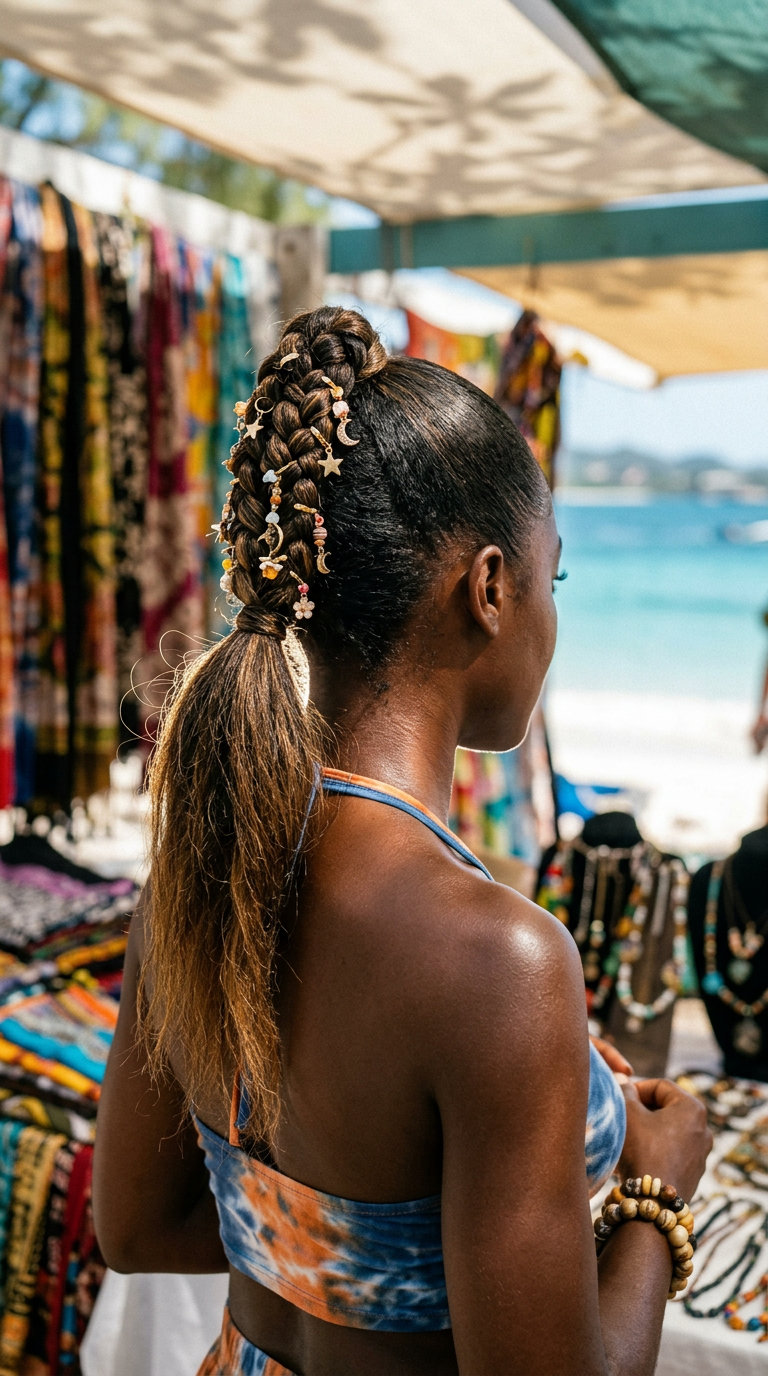
Voluminous Curly Pineapple Ponytail

Skip the elastic at the very crown. A curly high ponytail tutorial for textured hair works best when you gather your curls slightly off-center and higher than you think you need them—this prevents the weight from pulling the curl pattern straight. Use a silk or satin scrunchie, not a rubber elastic, to avoid breakage, and wrap it loosely enough that you can slide one finger underneath. Flip your head upside down and gently fluff the crown and sides with your fingers to redistribute volume, then flip back and smooth down any flyaways along your hairline with a curl-defining cream. The pineapple shape happens naturally when curls settle into a gathered position, so don’t over-style it. Refresh your edges each morning by misting them with a light leave-in conditioner and smoothing with your fingertips, and the whole thing holds through multiple days without re-doing the full ponytail.
Twisted Palm Tree Half-Up

The half up twisted ponytail works on wavy hair because the texture grips itself—no slipping, no redoing every ten minutes. Start with day-two hair if possible; fresh-washed strands are actually harder to twist. Divide the top section horizontally from ear to ear, then twist each side loosely toward the back of your head. The mess is the point here. Overlap the two twisted sections and secure with a clear elastic, then pull a few face-framing pieces free to soften the crown and let the remaining waves fall naturally down your back.
Glass-Slick High Ponytail

A wet look high ponytail tutorial is not actually about wet hair—it’s about a slicked finish that reads architectural and sharp. Pull all hair straight back into a high crown ponytail, then use a gel or mousse with light hold to smooth every flyaway and create that mirrored, almost plastic sheen. The illusion works because you’re creating zero texture and maximum control. This style demands straight or near-straight hair; wave in it will break the illusion and look unintentional rather than deliberate, which defeats the whole premise.
Soft Wave High Ponytail

For a wavy high ponytail tutorial that actually holds and doesn’t deflate by lunch, you need to build the waves before you gather. Curl or wave your entire head, let it cool fully, then pull everything into a high base and gently brush out the curls just enough to soften them into waves rather than ringlets. The brushed-out texture is what keeps volume in the ponytail itself and prevents that sad, collapsed look. Leave face-framing pieces out and slightly tousle them by hand to add that romantic, garden-party feeling.
Tiny Piecey Pixie Pony

The pixie cut ponytail tutorial is basically a proof-of-concept that length isn’t the only thing that creates presence—texture and placement do. Pull your short, razored hair into a tiny high pony at the crown using a small clear elastic, then let the piecey layers fall around your face and sides. The short pieces won’t cooperate, and that’s correct. A bit of dry texture spray at the roots gives grip and keeps those tiny strands from sliding out of the elastic, but the slight disorder is what makes it read as intentional rather than sloppy.
Braided Crown High Ponytail

A braided high ponytail tutorial works best on medium to long hair with some texture to grip. The braid starts at your nape and wraps upward, anchoring everything at the crown—it’s the structural trick that keeps this from sliding down by hour three. Straight hair needs texture first; use a lightweight texturizing spray on damp roots and let it dry, or sleep in loose waves the night before. Wavy and thick hair? You’re already set.
Section the back third of your hair horizontally from ear to ear. Braid that section loosely—tight braids look rigid and pull the scalp. Fold the braid upward and pin it flat against your head using bobby pins that match your hair color, positioning them horizontally so they disappear into the braid itself. Gather everything else into a high ponytail at the crown, directly above where the braid ends. This two-step anchoring is what separates the versions that hold for eight hours from the ones that don’t.
Sleek Bob High Ponytail

The bob high ponytail tutorial is not what you’d expect—short hair can do this. A blunt bob at chin length or longer has enough density to create a high ponytail without looking sparse. Clip-in extensions work if your natural length falls short, but the trick is matting down the crown first so the base reads clean and intentional, not patchy. This is minimalist pony done right.
Blow-dry your hair straight using a flat paddle brush, focusing on pressing the roots down at the crown and sides. Use a fine-tooth comb to slick everything back into a high elastic positioned slightly forward of center—forward placement creates visual lift on round and square faces. Wrap a thin section of hair around the elastic’s base to hide it, securing the wrap with a bobby pin underneath. The wrap has to be seamless; this is where the entire look lives or dies.
Half-Up Crimped Festival Pony

Start with a crimping iron on straight or wavy hair—the texture multiplies whatever volume you already have. Section the top half of your hair and crimp vertically in quarter-inch sections, working from roots to ends; this takes longer than flat-ironing but the texture holds through sweat and humidity. Don’t crimp the underneath layers; you want texture on top for drama and smooth underneath for weight and control. Straight hair needs this contrast or the style reads costume instead of intentional.
Gather the crimped top half into a ponytail at the crown, leaving two face-framing pieces loose. The 80s crimped hair tutorial lives here—the half-up placement softens the intensity of the crimp texture and keeps it from reading as a throwback costume. Secure with a clear elastic so the crimp texture shows, then wrap a thin piece of crimped hair around the base for a polished finish. The loose pieces should hit your cheekbones, softening the entire effect.
Tousled Palm Tree Ponytail

Wavy or curly hair makes this happen instantly. A tousled high ponytail tutorial requires zero smoothing and minimal effort once you understand the structure—the messiness is intentional, built from texture, not carelessness. Start with second-day hair or apply a texturizing spray to clean hair and let it sit for two minutes before styling. This gives your waves something to grab onto and amplifies volume at the roots without crunchiness.
Flip your head upside down and gather hair into a high ponytail while inverted, securing it loosely. Flip back up and use your fingers to pull out face-framing pieces around your temples and ears, then gently tease the crown and the ponytail base for volume. The inverted gather creates that “just pulled up” energy, and the teasing adds dimension without looking intentionally structured. Spritz lightly with a flexible-hold spray—this keeps the tousled shape for six to eight hours without feeling stiff or crunchy.
Extended Glamour High Ponytail

Thin or fine hair demands extensions to achieve the thick, weighted ponytail that reads as polished rather than sparse. A ponytail extensions tutorial starts with placement—clip extensions into the crown area (not the base of your ponytail) to create the illusion of lift and fullness at the roots, where thinning shows first. Use extensions that match your hair texture, not just your color; straight extensions in wavy hair look grafted, and that breaks the entire effect.
Blow-dry your natural hair smooth and gather it into a high ponytail, securing loosely. Clip extensions into the crown section above the elastic, fanning them outward so they blend with your natural ponytail. Wrap a thin section of your natural hair around the elastic base, then gently brush through the entire length to blend extension roots with your hair. The wrapped base is non-negotiable—it hides every trace of the clip mechanism and transforms the look from DIY to polished.
Glass-Slick Low Ponytail

A sleek low ponytail tutorial starts with smooth hair and a strategy for keeping flyaways locked down for the entire day. Start at the nape—not the crown—so the base sits low and polished, exactly where Hailey Bieber wears hers on yacht decks and gallery openings. Medium to long hair works best here; anything shorter won’t have enough length to anchor cleanly. Brush your hair back with a fine-tooth comb, apply a smoothing serum or anti-frizz cream to damp roots, then blow-dry with a paddle brush using downward strokes for maximum shine. The glass finish is the whole point—no texture, no disorder, just pure reflection.
Gather everything into a low elastic at the nape and secure with bobby pins tucked underneath for invisibility. A second elastic placed half an inch below the first creates tension that prevents the ponytail from slipping down throughout the day, which happens to even the most meticulous versions after 6 hours of movement. Smooth the sides with a fine-tooth comb and a dab of gel. This style holds best on day-two hair when natural oils have settled into the strands, making the whole thing feel intentional rather than just pulled back.
Gravity-Defying Fountain Pony

The fountain ponytail tutorial is advanced. This isn’t a casual style—it requires a specific technique where a hidden elastic sits one inch above your main base, creating an upward arch that defies what hair should naturally do. Chris Appleton calls this the lift, and it’s the reason Ariana Grande’s ponytails look like they’re floating. Thick, straight hair holds the architecture best, though wavy textures work if you blow-dry them smooth first and use a light hairspray to lock the shape in place before securing the main base.
Gather a thin section at the crown and secure it with a clear elastic, pulling upward and backward at a 45-degree angle. This becomes your hidden anchor. Then gather all remaining hair below it and secure with your main elastic, covering the evidence. The result is a ponytail that lifts away from the head with an impossible height, perfect for a beachside dinner where the light hits it all night long and people ask how you did it. Expect 20 minutes the first attempt, closer to 8 minutes once your fingers understand the tension needed to make the hidden elastic stay put.
Y2K Festival Palm Pony

Start with wavy hair—either second-day texture or curled with a wand—and pull it into a high ponytail at the crown, not the very top of your head. This placement matters because it creates visual interest and space for clips to sit without looking like they’re sliding down. The wavy texture does the work for you; you don’t need perfect waves, just enough movement that the style reads as intentional rather than hastily assembled.
Add metallic hair clips or small geometric pieces along both sides of the ponytail, spacing them an inch apart and angling them slightly downward so they follow the curve of your head. You can layer different sizes and finishes—matte clips next to glossy ones—for depth. The whole look sits in a hotel conservatory under bright, diffused light, which is exactly where this style shines. This is where the accessorized high ponytail becomes a complete statement: the clips catch light, the waves move when you turn your head, and the playfulness reads immediately to anyone watching.
Professional Twisted High Pony

The twisted high ponytail tutorial works because twists at the hairline add visual sophistication without requiring braiding skills. Zendaya wears this version to events where the lighting is perfect and the atmosphere is pure luxury—hotel lobbies, cocktail bars, anywhere a single strand out of place reads as intentional. Start with blow-dried, straight hair and create a deep side part, then twist a thin section from the part line back toward the crown, securing it with a bobby pin. Repeat on the opposite side, twisting backward at the same angle so both spirals frame your face and meet at the base of your ponytail.
Gather everything into a high elastic and smooth the entire surface with a lightweight gel or mousse, ensuring no flyaways disrupt the line from twisted detail to tail. The style holds for a full workday because the twists at the hairline anchor everything—they’re the structural engineering that makes the rest seem secure. Second-day or third-day hair actually works better here than freshly washed strands, since some grip in the texture helps the twists hold their shape without constant adjusting throughout your 8-hour shift.
Sculpted Double-Pony Statement

A double high ponytail tutorial requires thick hair and a willingness to look sculptural rather than soft—this is futuristic, not romantic. Divide your hair vertically down the center from forehead to nape, creating two equal sections. Each section becomes its own high ponytail secured at the crown with separate elastics, positioned just a half-inch apart so they read as intentional twins rather than a mistake. Straight hair only; any wave breaks the architecture and makes the style look accidental instead of deliberate.
Smooth both tails separately using a fine-tooth comb and lightweight gel, pulling each downward and away from its elastic so the base feels rigid and holds completely still. The edges should be sharp—no softness, no wisps. This isn’t a style for movement; it’s for standing still at a beach bonfire where the firelight creates shadows under the sculpted shape, making the geometry obvious. Wearing this at a festival means accepting that it requires renewal every 2 hours when humidity or wind starts loosening the structure, which is fine if you understand the commitment upfront.
Half-Up Crimped Festival Pony
A braided high ponytail festival look lives or dies by what you clip into it. Gather the top half of your hair into a high ponytail, then braid down from the base—messy is correct here. Weave small metallic charm clips through the braid as you go, spacing them every 2-3 inches. The clips catch light when you move, which is literally the only job they have to do. What makes this advanced isn’t the technique itself; it’s keeping the braid loose enough to look intentional while tight enough that charms don’t slide out when you’re dancing or walking through a crowd. Skip this if you have very fine or thin hair—the weight of multiple clips will pull the whole style down by hour three.
Y2K Spiky High Ponytail

A snatched high ponytail tutorial requires two things: tension and shine. Pull your hair back so tightly that your edges lift slightly—this is the snatched part, and it’s not optional. Use a clear elastic at the crown, then smooth the top section with a fine-tooth comb and edge control product to seal every flyaway. One hack that actually works: place the elastic slightly lower than you think you want it, then flip the ponytail up through the top gap and secure it again. This double-elastic method gives you that lifted, gravity-defying crown that reads as intentional rather than accidental. Tension damage is real, so only keep it in for a few hours and always sleep with it down. The glossy finish comes from a serum or lightweight spray applied to the ponytail shaft, not the roots.
Retro Flipped-Ends High Pony

The flipped ends ponytail tutorial works because the 1960s understood physics better than we give them credit for. Blow-dry your hair straight, then gather it into a high, tight ponytail and secure it with an elastic. Take the ponytail and flip the ends outward—literally curl them under away from your face using a round brush and heat, or wet your hands and flip them while damp and let them air-dry in that position. The shape only holds on straight or wavy hair that’s got some density to it; this won’t work on fine or very thin textures. The best part? You can wear this for 6-8 hours easily, and it reads as polished without looking like you tried too hard. This is retro chic done right, not retro costume.
Soft-Wave Voluminous High Pony

The heatless curls high ponytail move in your favor when you start the night before. Dampen your hair, wrap it around large velvet rollers or in a braid, and sleep on it. In the morning, release the curls and gather them into a high ponytail at the crown—the volume sits naturally because each curl has its own lift. This works best on wavy, medium, or thick hair that holds texture overnight without frizz. Rough it up a little at the base with your fingers; the slightly tousled look is exactly what you’re after. By hour eight, the curls will soften into waves, and that’s actually better than the first two hours. This is low-maintenance styling for people who don’t want to think about their hair once it’s up.
Still Deciding? Here’s a Quick Comparison
| Hairstyle | Difficulty | Maintenance | Best For | Pros | Cons | |
|---|---|---|---|---|---|---|
| Short (Pixie & Crop) | ||||||
| 9. The Piecey Texture Pixie Palm Pony | Easy | Low — trim every 8 weeks | Daily Wear, Concert, Casual Outing | Low maintenanceEasy to style at homeSuits most face shapes | Not ideal for very curly hair |
| Medium (Bob & Lob) | ||||||
| 2. The Tousled Beach Wave Palm Pony | Easy | Low — trim every 8 weeks | Weekend, Beach Day, Rooftop Happy Hour | Low maintenanceEasy to style at homeSuits most face shapes | Not ideal for very curly hair |
| 3. The Wrapped Silk Scarf Palm Pony | Moderate | Medium — trim every 5-6 weeks | Date Night, Brunch, Rooftop Happy Hour | Suits most face shapesWorks on multiple textures | Not ideal for very curly hair |
| 4. The Sleek Glass-Finish Palm Ponytail | Moderate | Medium — trim every 5-6 weeks | Job Interview, Professional Event, Rooftop Happy Hour | Suits most face shapesWorks on multiple textures | Not ideal for very curly hair |
| 5. The Textured Tropical Volume Ponytail | Easy | Low — trim every 8 weeks | Music Festival, Beach Day, Rooftop Happy Hour, Casual Weekend | Low maintenanceEasy to style at homeSuits most face shapes | Not ideal for fine hair |
| 6. The Half-Up Twisted Palm Pony | Moderate | Low — trim every 8 weeks | Weekend, Outdoor Brunch, Casual Date | Low maintenanceSuits most face shapesWorks on multiple textures | Not ideal for very curly hair |
| 7. The Wet-Look Architectural Palm Ponytail | Moderate | Medium — trim every 5-6 weeks | Night Out, Beach Club, Editorial Shoot | Suits most face shapesWorks on multiple textures | Not ideal for very curly hair |
| 8. The Soft Wave Palm Ponytail | Moderate | Medium — every 6-8 weeks | Summer Wedding Guest, Date Night, Rooftop Happy Hour, Brunch | Suits most face shapesWorks on multiple textures | Not ideal for very curly hair |
| 11. The Braided Stem Palm Ponytail | Moderate | Low — trim every 8 weeks | Gym, Music Festival, Outdoor Activities | Low maintenanceSuits most face shapesWorks on multiple textures | Not ideal for very curly hair |
| 12. The Sleek Bob Palm Ponytail | Moderate | Low — trim every 8 weeks | Daily, Work, Minimalist Event | Low maintenanceSuits most face shapesWorks on multiple textures | Not ideal for very curly hair |
| 13. The Retro Crimped Half-Up Palm | Moderate | Medium — trim every 5-6 weeks | Festival, Themed Party, Concert | Suits most face shapesWorks on multiple textures | Not ideal for very curly hair |
| 14. The Tousled Tropical Palm Ponytail | Easy | Low — trim every 8 weeks | Weekend, Brunch, Rooftop Happy Hour | Low maintenanceEasy to style at homeWorks on multiple textures | Not ideal for fine hair |
| 15. The Extension-Enhanced Wrap-Around Ponytail | Moderate | Medium — trim every 5-6 weeks | Formal Event, Wedding Guest, Red Carpet, Gala | Glamorous, Bold, Sophisticated, Celebrity Chic | Not ideal for very curly hair |
| 16. Glass-Finish Low Palm Ponytail | Moderate | Medium — trim every 5-6 weeks | Professional, Job Interview, Formal Events | Suits most face shapesWorks on multiple textures | Not ideal for very curly hair |
| 17. The ‘Fountain’ Palm Ponytail | Moderate | High — trim every 3-4 weeks | Music Festival, Red Carpet, Night Out | Suits most face shapesWorks on multiple textures | Frequent salon visits needed |
| 18. The Glam Clip-Adorned Palm Pony | Easy | Low — trim every 8 weeks | Date Night, Brunch, Summer Social | Low maintenanceEasy to style at homeSuits most face shapes | Not ideal for very curly hair |
| 19. The Twisted Detail Palm Pony | Moderate | Low — trim every 8 weeks | Professional, Date Night, Rooftop Happy Hour | Low maintenanceSuits most face shapesWorks on multiple textures | Not ideal for very curly hair |
| 20. The Sculpted Double Palm Ponytail | Moderate | High — trim every 3-4 weeks | Festival, Avant-Garde Event, Night Out | Suits most face shapesWorks on multiple textures | Frequent salon visits needed |
| 22. Braided Palm with Charm Clips | Moderate | Medium — trim every 5-6 weeks | Music Festival, Concert, Summer Event | Suits most face shapesWorks on multiple textures | Not ideal for very curly hair |
| 23. The Snatched Y2K Palm Pony | Moderate | Medium — trim every 5-6 weeks | Date Night, Night Out, Summer Party | Suits most face shapesWorks on multiple textures | Not ideal for very curly hair |
| 24. The Flipped Ends Palm Pony | Moderate | Medium — trim every 5-6 weeks | Date Night, Themed Party, Weekend | Suits most face shapesWorks on multiple textures | Not ideal for very curly hair |
| 25. Voluminous Heatless Curls Palm Pony | Easy | Low — trim every 8 weeks | Weekend, Brunch, Casual Date Night | Low maintenanceEasy to style at homeSuits most face shapes | Not ideal for very curly hair |
Frequently Asked Questions
What’s the easiest palm tree ponytail for natural or wavy hair?
For genuinely easy, low-maintenance styles, check out The Tousled Beach Wave Palm Pony or The Textured Tropical Volume Ponytail —both rated easy and designed to enhance your natural texture with minimal fuss. Neither requires heat styling or obsessive product layering.
Can I achieve a sleek, polished palm tree ponytail at home?
Absolutely. For a sharp, glass-like finish, The Sleek Glass-Finish Palm Ponytail uses strong-hold products and a flat iron for precision. The Wrapped Silk Scarf Palm Pony also delivers a chic, polished base without needing heat tools.
What tools do I need for a high-tension, long-lasting palm tree ponytail?
Bungee hair elastics are non-negotiable for maximum tension and hold. Styles like The Spiky Y2K Palm Hybrid Ponytail and The Sleek Glass-Finish Palm Ponytail rely on them to stay put for 8+ hours without slipping or snapping your hair.
How do I keep my palm tree ponytail from getting frizzy in humidity?
Edge control gel and a flexible-hold hairspray are your defense. Apply edge control to your hairline and any flyaway zones before styling, then lock everything down with hairspray once the ponytail is secured. A shine spray on top adds a final protective layer against moisture.
Final Thoughts
Here’s the thing about a summer palm tree ponytail 2026: it doesn’t care if you got it perfect on the first try. By hour eight, when the curls have softened into waves and half your flyaways have escaped, that’s actually when it looks best. Stop fussing with it.